AutoDither provides automatic dithering of guided exposures in CCDSoft by moving the guide star in a pre-defined pattern between exposures.
Copyright © 2005 by Paul Kanevsky. All Rights Reserved.
AutoDither is provided free of charge for all non-commercial use. Permission is given to distribute AutoDither in its original, un-modified form and only free of charge. The author accepts no responsibility for direct or consequential damage caused by the use of this software: use it at your own risk!
AutoDither is provided as-is, and although I will attempt to make changes and fixes as they become necessary, I provide no guarantees about its suitability for any purpose whatsoever.
AutoDither is based in part on sample source code provided by Ron Wodaski and others, whose generous help is greatly appreciated
Version 1.1.8 is released to provide support for Minimum and Maximum autoguider move settings in CCDSoft. Prior to this version, these settings were ignored, causing AutoDither to make corrections as large or as small as required, without limitation. With the new version, AutoDither will read and enforce these settings, with the following important difference:
NOTE: Minimum and Maximum autoguider move settings from CCDSoft will be interpreted as PIXELS, not seconds, the way CCDSoft normally does. In other words, a minimum move setting of 0.1 will cause guider to ignore any adjustments of less than 0.1 pixel. A maximum move setting of 2.0 will cause any correction larger than 2 pixels, to move only by 2.0 pixels at a time.
Using these settings allows one to limit the maximum error due to wind, cosmic ray strikes, etc. and to reduce unnecessary tiny corrections that may result in chasing the seeing.
Dithering is done by introducing a small offset between exposures. This helps mitigate the effects of hot/cold pixels and other artifacts normally present in the image that remain constant from exposure to exposure. To get the full benefit of dithering, it is important to use an outlier rejection stacking method, such as Sigma-Reject, Median, and other variants of these. There is still a benefit to dithering even when not using any of these stacking methods, but the artifacts may not be completely eliminated
AutoDither works with all latest CCDSoft 5.0 versions. A guider and an imager CCD camera compatible with CCDSoft is also necessary. AutoDither currently does not work in conjunction with AO-7 from SBIG.
Visual Basic 6.0 run-time environment must already be present on the computer. If not, download the VB support files first from here.
AutoDither should work with Windows NT, 2000, and XP. It may work with other versions of Windows, but I can't verify this.
Dithering is an advanced autoguiding technique used to reduce "impulse" or non-random noise that occurs in multiple image frames. It is not for everyone!
AutoDither is recommended for anyone who has mastered autoguiding and is ready to move on to the next level of image smoothness and quality. If you are still not comfortable with simple autoguiding or struggle with autoguiding configuration, I'd suggest you hold off on using AutoDither until you are more at ease with the basic image acquisition.
AutoDither, although simple to use, will introduce an additional level of complication into a process that is already not simple.
If you have a good grasp on autoguiding, and have no problems collecting frame after frame of well-guided images, AutoDither is for you! <G>
AutoDither provides two kinds of dither: Random Walk and Spiral. Either method helps reduce unwanted artifacts, but the Spiral mode is probably best as it ensures that the artifacts are moved between as many pixels as possible between exposures.
The user can specify the dimensions of the dithering box (maximum distance the guide star will travel from the center position in each direction) and the size of each dithering step, i.e. how far the star will move between each exposure.
AutoDither saves all of the user-entered parameters, and will default to these the next time you use it.
To install AutoDither,
1. Download the installation file, unzip it to a temporary directory.
2. Exit CCDSoft if it's running
3. Locate CCDSoft Version 5.0 folder. It's usually located in C:\Program Files\Software Bisque\CCDSoft Version 5.0
4. Check that there is a folder in this directory called
Camera Event Plug Ins. If it doesn't
exist, create a new folder with that name, spelled exactly this way:
Camera Event Plug Ins
For default installation of CCDSoft, this folder
should appear as follows:
C:\Program Files\Software Bisque\CCDSoft Version 5.0\Camera Event Plug Ins
5. Copy AutoDither.dll from the temporary directory to the Camera Event Plug Ins directory.
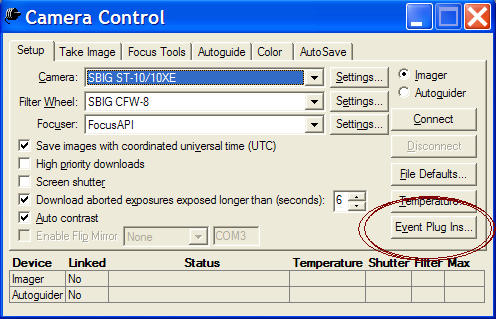
6. Start CCDSoft. Go to the Camera Setup dialog. The Event Plug Ins... button on the lower right should be enabled. Click on it. If the button is disabled, double-check that you spelled the folder name correctly in step 4, and that the AutoDither.dll exists in this folder. If you made a mistake, exit CCDSoft, fix the problem, and try it again.
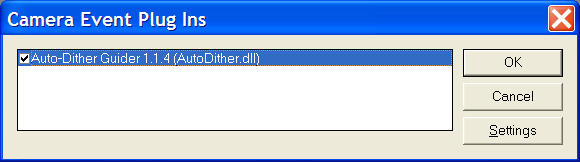
7. Click on the Event Plug Ins... button to bring up the plugin selection window:
8. Check the check-box next to Auto-Dither plugin, and click on the Settings button.
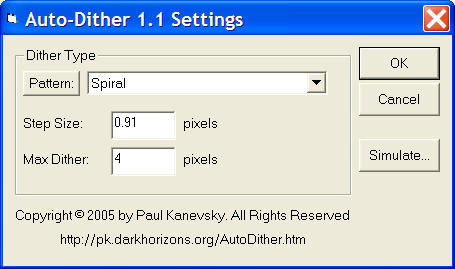
9. Now choose the appropriate settings for your imaging style, and click on OK:
10. That's it! Read the section on how to use AutoDither below.
AutoDither makes dither position adjustments upon a completed acquisition of an image. The adjustments are made based on user entered configuration settings. No adjustmens are made if the autoguider is not running. If the autoguider is running and AutoDither is enabled, the dither corrections will be made each time a new image is acquired with the main imager camera or chip.
To disable AutoDither, go to the Event Plug Ins... selection dialog from Camera Setup tab, and uncheck the checkbox next to Auto-Dither plug in.
Step Size determines maximum move between exposures in autoguider pixels. A value of 1 means that each dither step will be 1 autoguider pixel in size in X and/or Y directions. This can be fractional. Ideally, this should be at least as large as to move the image by one imager pixel. To find out what that value is, divide the size of the imager pixel by the size of the autoguider pixel.
For example, my ST10xme has a TC273 guide chip with pixel size of 7.4 microns. The main imaging chip has pixel size of 6.7 microns. This means the minimum step size should be 6.7/7.4 or about 0.91 pixel. It's OK to make this number larger, for example 1.0.
Note: when the autoguider chip is binned 2x2, the pixel size is doubled. To account for this set the step size to 1/2 of the value used when binning 1x1. If autoguider chip is binned 3x3, set the step size to 1/3 of the bin 1x1 value. For example, a 0.91 step size will be 0.46 when guder chip is binned 2x2, and to 0.3 when binning 3x3. Similarly, when imaging chip is binned 2x2, the step size should be doubled.
Max Dither setting defines the box around the autoguiding window center that sets the limits of how far the guide star will travel. For example, a setting of 4 means that the guide star will travel four pixel to the left of center, four pixels to the right, four pixels above, and four pixels below. The box, in this case, is of size 9x9 pixels (includes the center pixel).
The default autoguider box is 32x32 pixels in CCDSoft. It is important to make the Max Dither settings small enough that the guide star will not be moved close to the autoguider window edges. I'd recommend keeping this setting to 8 or less.
Note that the Max Dither setting and Step Size settings together define how many unique pixel positions the guide star can be moved to. For example, a 9x9 box (Max Dither=4) with 1 pixel step size allows for up to 81 unique positions. Step Size of 2 will only allow 40 unique positions within the box. A Max Dither setting of 8 (box size 17x17) and Step Size of 1 allows 289 unique pixel positions.
AutoDither provides some built-in types of dither, plus you can create custom patterns yourself:
I recommend using spiral or one of the "Snake" dithers to start out, but you're welcome to try Random to see if you like it. The difference between these is where the guide star is moved between exposures.
AutoDither remembers not only the settings entered in the configuration dialog, but also the last dithered position used. This is remembered even if you shut down CCDSoft or your computer in between taking multiple frames. To reset dithering to the central pixel, simple bring up the settings dialog and click on the OK button (no need to change any settings).
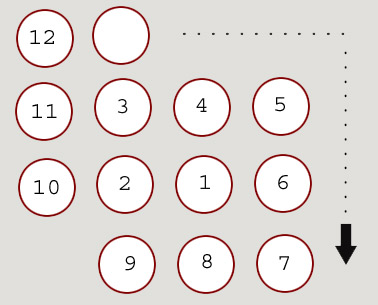
For example, say that 4 images are acquired in the spiral pattern (see picture below), stopping at position 4. Say that you then reboot the computer and restart dithered acquisition. The first frame will be acquired at position 5, as if you didn't stop autoguiding or acquiring images. This is done to allow for multiple start/stop/restart acquisition patterns that still benefit fully from the non-repeated spiral pattern. This also allows the spiral pattern to be continued on a different night, getting the full benefit of dithering across frames taken on different dates.
There's no downside to starting a completely new acquisition run at the position where the previous one left off: the spiral will just not be started at the center, but will continue to spiral out, and then in. In other words, there's usually no reason to reset the starting dithering position to the center.
When Spiral dither is chosen, the guide star is moved in a well defined, clock-wise, unwinding spiral pattern. The spiral starts at the center location and continues to unwind in moves of one StepSize at a time, until the bound box defined by Max Dither is reached. At that point, the spiral continues in clock-wise direction but this time winding pattern towards the center. When the center point is reached, the spiral once again begins to unwind. In this way, all the pixels in the Max Dither box will be visited as few times as possible, and no pixel will be repeated more than others. The unwinding pattern looks something like this:
Snake dithers are provided to try to minimize the effect of mount backlash in Declination. If your camera is aligned so that the camera horizontal direction corresponds to Right Ascention (RA), then try using one of the Horizontal Snake dithers. The 10x10 dither maps out points in a snake pattern through a box +/-5 pixels around the central pixel. The first point of this pattern will be the upper left corner of the box (coordinate -5,-5) relative to central pixel. The snake will proceed to move left to right until it gets to the right side of the box (coordinate +5,-5). At that point, the pattern will move down one line vertically, and continue in the opposite direction, right to left. At the left-most point of the box, it'll again move down one line, and continue left-to-right. In this way, the Snake pattern will keep moving DEC in the same direction for as long as possible. Unfortunately, when the bottom right corner of the box is reached, it'll have to reverse vertical direction, and continue the same right-to-left/left-to-right pattern going up in DEC. This will happen only after (10+1)*(10+1) points were mapped out, or after 121 frames are acquired for the 10x10 dither.
The Vertical Snake dither is similar, but moves first from top-to-bottom, then one column over to the right, followed by bottom-to-top, one column over to the right, etc. This dither is recommended if the RA direction is aligned with vertical axis of the camera.
If 121 frames are for some reason not enough, and you still want to avoid all possible backlash, try the one of the 20x20 snake patterns. These form a box of (10+1+10)*(10+1+10), or 441 points before the dither has to reverse DEC direction. Note that the maximum dither parameter must be set to at least 10 to allow this dither to run properly.
A very simple dither pattern that moves the guide star half-a-pixel from the central pixel. This dither pattern only has four steps (around the four corners of a 0.5 pixel-sized box) but can be useful for some super-resolution algorithms that require dithering by a fractional step.
With version 1.1 of AutoDither, you can now create your own custom dither patterns. In fact, the Snake Dithers, as well as the Half-Box dither are just examples of custom dithers that are delivered with the installation. You can modify the Snake patterns, or create a totally new pattern through a simple setup dialog. Click here for instructions on how to create custom dithers.
To successfully use AutoDither, please first follow the instruction to enable the plugin as described in the Installation section.
When ready to image, start the autoguider in CCDSoft the way you would normally do it.
Note that as dithering steps are taken, the Autoguide tab in CCDSoft will report an autoguider error equal to the dither step size. This is normal, and will not affect guiding performance.
For example, after the first dither adjustment, the autoguider error with Step Size of 1 will be reported as -1 in X and 0 in Y. Even though CCDSoft thinks there's an error, AutoDither knows the right location of the guide star, and will make the appropriate corrections to keep it centered on the right pixel.
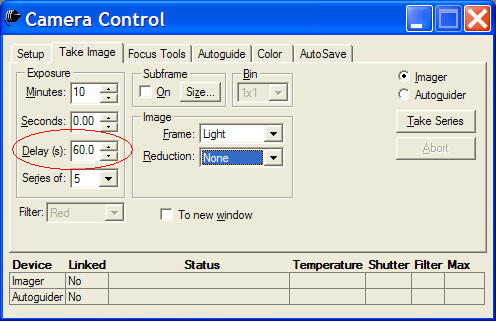
It is important to add some additional delay time to the imager exposure. This is necessary to give AutoDither enough time to reposition the guide star in a new dither position. How much time you'll need will depend on your focal length, mount guide speed, Step Size, backlash, etc.
I suggest starting out with a delay of 60 seconds. If the mount doesn't stabilize at the desired coordinate after 60 seconds, you may need to increase the delay. If the mount is very quick and accurate, then you can lower this value to as little as 10-15 seconds.
If your mount has excessive backlash in DEC, I suggest adding some extra delay time in order to let the mount take up the backlash when reversing DEC directions. In a future release a new pattern of dithering will be provided that will help reduce DEC reversals, making backlash less of an issue.
Current version 1.1.8 beta of AutoDither is available to download as a WinZip file:
Click here to download AutoDither v1.1.8 beta
If you don't have the Microsoft Visual Basic 6.0 run-time already installed on your computer, you can download it from here:
Click here to download VB Run-time support files directly from Microsoft
| Release Date | Version Number |
Comments |
| 10/15/2005 | 1.1.08b | Added support for CCDSoft's Minimum and Maximum move
autoguider setting. Autodither will now enforce these settings, but will interpret the numbers entered there as minimum and maximum moves in PIXELS, not seconds, the way CCDSoft normally does. |
| 07/10/2005 | 1.1.07b | Bug fix for international configuration using fractional
Step Size Bug fix to allow for correct importing of older custom patterns created prior to version 1.1.06b in international configurations |
| 07/06/2005 | 1.1.06b | Support for international Windows configurations Logging option added |
| 06/22/2005 | 1.1.04b | A few new dither patterns added Custom dither editor added Dither previewer/simulator added |
| 06/13/2005 | 1.0.20b | Added validation checks Dither position is now remembered across sessions |
| 06/08/2005 | 1.0.00b | Initial beta release |
If you're having problems using AutoDither or have comments or suggestions for improving it drop me a line here.