
Starting with Version 1.1 AutoDither Plugin supports the creation of custom dither patterns. To create a new dither, invoke the Settings dialog box:
Click on the Pattern combo-box, and select <Add New Pattern...> at the bottom of the list. The Custom Dither Pattern dialog will be displayed.
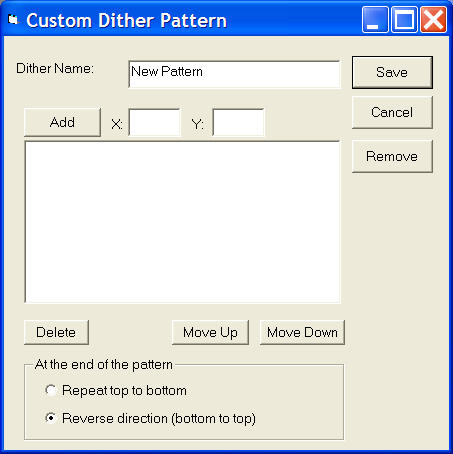
Enter the name you'd like to use for this pattern, and then enter any number of coordinate offsets in the X: and Y: edit boxes. The offsets are coordinates that you'll define for each of the steps of the dither. The coordinates are relative to the central pixel of the guide box (0,0). So, to move up and left by one step, the first coordinate should be defined as (-1,-1). To move down 2 steps, the coordinate would be (0,2). To move right by one and down by half a step, the coordinate would be (1, 0.5). After you specify the X and the Y coordinates, press the Add button to add it to the list of pattern steps.
The steps you define will be executed from top of the list to the bottom of the list, starting with the first coordinate entered. When the last coordinate you enter is reached, AutoDither can do one of two things:
1. Repeat the same pattern from the top of the list. This may potentially result in a large jump from the bottom coordinate to the top, depending on the shape of the dither pattern.
2. Reverse direction. This will continue to execute from bottom to top, i.e., in reverse order. When the top coordinate is reached, the dither will proceed from top to bottom, again repeating the same pattern. In this way, the distance the autoguider needs to move between steps is minimized.
You can re-arrange the step order by using the Move Up or Move Down buttons after clicking on the step you'd like to reposition. You can also delete any of the steps by selecting it and hitting the Delete button.
When done making changes, click on the Save button, and you can now pick your new dither from the drop-down list in the AutoDither Settings dialog.
If at any point you'd like to make changes to your dither (or one of the built-in dithers), simply select the dither in the settings dialog, and press the Pattern: button next to the drop-down. Make whatever changes you'd like to the steps or the name of the dither pattern, and then hit Save to make the changes permanent.
If you want to remove a dither from the list (this will permanently delete it!), select it from the drop-down list, click on the Pattern: button and click on Remove button in the Custom Dither dialog.
Simulator is a useful feature that makes it easy to see how your dither will perform under the stars. Any dither can be simulated to see if the desired pattern is achieved, including any of the built-in dithers. To invoke the Simulator simply go to the Settings dialog, select the desired dither from the drop-down, and then click on Simulate... button.
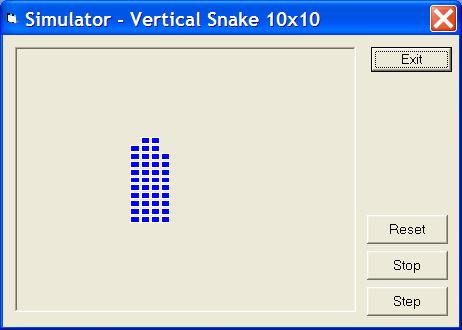
The Simulator will automatically run through the pattern specified in the dither, constrained by Max Dither and Step Size parameters in AutoDither configuration. Each blue dot (red when direction is reversed) represents a single step in the dither pattern. The overall box contains 32x32 dots, representing 32x32 pixels in the guide window of CCDSoft. Note that if your dither step or step size specifies a fractional coordinate, the dots may overlap.
You can stop the automatic run by pressing the Stop button. If you hit Reset, the dither will reset to start at the initial coordinate, otherwise it'll continue from where it was stopped. To step through the dither pattern one step at a time, simply click the Step button. When done, click on Exit to return back to the Settings dialog.
