Newsflash! 10/16/2005: StarSieve is no longer available for purchase.
StarSieve and CFWHM have been superceded by a new product: CCDInspector 1.0. StarSieve is no longer available as a stand-alone product.
CCDInspector contains both original products, and provides significant enhancements and innovations. The new package is being distributed by CCDWare, and is available for a trial download.
Read all about CCDInspector 1.0
Improve quality of your images: increase sharpness and resolution.
Automatically sort many images at once by evaluating star sharpness and tracking quality.
Pick the best sub-frames for stacking, or for deciding which to keep.
*NEW!!!* Now supports 8 to 32 bits per color TIFF images, great for DSLR users!
*NEW!!!* Measure and plot focus variations due to tilt or field curvature
See what else is new in this version
Astrophotograpers, CCD and digital camera users often take many shorter images to later process and stack to simulate one long exposure. To produce the highest quality image, it is important to eliminate from the stack sub-frames that are of lower quality than the rest. Sub-frames can be inferior due to changing focus, dew, tracking errors, flexure, mirror flop, wind, vibration, clouds, and many other things.
With StarSieve, you'll be able to quickly select the best frames of the batch by measuring the quality of each of the images. The chosen images can be quickly moved or copied to a subfolder for stacking or further processing. What's more, StarSieve is independent of any capturing or processing software and can be used on all SBIG or FITS formatted images on your computer. If your images are recorded with focal length information in the header, than multiple images, even acquired with different focal length and aperture, can be compared by computing the FWHM value in arcseconds.
Copyright © 2005 by Paul Kanevsky. All Rights Reserved.
The author accepts no responsibility for direct or consequential damage caused
by the use of this software. StarSieve is a supported software.
StarSieve was designed to perform the following functions:
1. Quickly and easily select any number of images from multiple folders for
analysis
2. Measure the quality of all the selected images with a click on a single
button
3. Sort the results by sharpness (median star FWHM value) or by their aspect
ratio (how round the stars are)
4. Select the best or the worst of the images sorted by FWHM or by aspect ratio
and move them or copy them to a separate folder
5. Stack, and otherwise process the images in the new folder using whatever
software you normally use.
6. Measure field flatness of your setup, including imaging plane tilt from any
image.
StarSieve contains some very sophisticated algorithms to provide the most accurate measurement possible, while ignoring spurious data, noise, and artifacts. It is based on the same technology as our CFWHM real-time plugin, but unlike CFWHM, StarSieve works on batches of images and does not require CCDSoft or Maxim DL or any other software to perform its function.
To install StarSieve,
1. Download the installation file
2. Double-click on the StarSieve.msi file to start the installation.
3. Follow prompts to select folders StarSieve. In most cases, accepting the default values will be sufficient.
4. On completing the install, double-click the StarSieve Panel icon on your desktop.
Start StarSieve by double-clicking on the StarSieve Panel icon on the desktop:

StarSieve
StarSieve window will come up. The window is resizable, so you can expand it or collapse it to see more or less of the image data:..
The display is designed to be as simple to use as possible. Here's a typical session with StarSieve:
1. Click on the Pick Images button. A windows explorer will come up giving you the ability to select one or more images you'd like to measure:
Note that only files with Extensions of FIT, FTS, FITS, and .S* will be listed, as these are all the supported image types
2. Select any number of the images from the Select Images window, and click Open. You'll see the images you picked added to the list of images in the StarSieve window:
3. If there are more images you'd like to sort through, simply click on the Pick Images button again, and select more images. The images can come from any number of folders.
4. To measure raw, unprocessed images more accurately, you may chose to subtract a dark frame from each. This is particularly recommended with very faint or long exposure images. To chose the dark frame reduction, click on the Reduce check box. You'll see the following window displayed:
Click on the Dark Frame button to browse for the appropriate dark frame file. Note that if you are measuring multiple exposures that of different exposure length, a single dark frame will not work on all of them. In this case, it is better to not use image reduction.
Also, if the images you are measuring have already been dark-subtracted in another software package, uncheck the Reduce check box, as a second dark-subtraction will be counter-productive.
5. Once you pick all the images, click on Measure All button and StarSieve will go through the list of newly added images and measure FWHM and aspect ratio for each.
Any images that do not contain enough stars (or are too noisy to measure) will be listed with "N/A" in the FWHM and Aspect ratio columns. All other images will have a number assigned to them representing their average FWHM and Aspect Ratio. If the images contain focal length information in their header, you can click the In Arcseconds check box on, and the FWHM values will be shown in arcseconds, otherwise FWHM will be given in pixels.
6. Once measured, you can sort the images by FWHM or Aspect ratio by simply clicking on the FWHM or Aspect (%) labels in the appropriate column. An up or down arrow will indicate what column is being sorted, and the direction of the sort (up means increasing values from top to bottom, down means decreasing).
7. At this point it is easy to see what images are better (the ones with lower FWHM values and lower Aspect Ratio). You can select a number of images to preview them before deciding to use them or not to use them. Simply highlight multiple images you want to see, and click on the Open Selected button. The chosen images will come up in a number of Image Viewer windows floating above StarSieve.
You can scroll around the image, and zoom in or zoom out by clicking anywhere in the image and picking the zoom level. As a shortcut, you can simply double-click on any of the image names in the StarSieve window to open it in the Image Viewer.
It is very easy to see the FWHM and Aspect Ratio values for any of the stars in the image: simply move the mouse pointer to point to the desired star, and a tool-tip window will pop-up with the measured statistics for this star. If there's no star or the star cannot be properly measured (for example if it's too dim or oversaturated, or bloomed), the tool-tip will display "N/A". Note that Image Viewer does not filter out hot pixels, as is done in the overall image Measurement step. This may result in some hot pixels displaying an FWHM and Aspect value -- you should be able to tell where the real stars are. Hot pixels are ignored when determining the overall image statistics.
8. When you decide on the set of images you'd like to use for stacking, you can select them in the StarSieve window, and then click on Move Selected or Copy Selected.
Move Selected will physically move the images from their original folder to the folder of your choice. Copy Selected will create a copy of all the chosen images, keeping the originals intact.
9. You can also drag-and-drop files between StarSieve and Windows Explorer. Files can be selected (the same as clicking Pick Images button) by dragging them into StarSieve. Once measured and sorted, files can be moved or copied to the folder open in Windows Explorer by selecting and dragging them from StarSieve to the explorer window. Note that if you use just the mouse button to drag images, they will be moved (equivalent to Move Selected). If you'd like to copy the files, leaving original images in the original folder, hold down the Ctrl key on the keyboard as you star the drag. This is the same way drag-and-drop works in Windows Explorer to move files between folders.
HINT: Sometimes, you may want to move several files at once. If this is the case, hold down CTRL when you click on the file names. Each name will stay highlighted as you select the next file. If all the files you wish to move are listed sequentially in a group, you can click on the first file, hold down the Shift key and click on the last file. To move the selected documents, hold down the mouse button and drag to the desired destination. To copy, hold down the Ctrl key as you start to drag. If you are having problems selecting multiple, please see FAQ item #1 below for a work-around.
10. Once images are measured, it is easy to create a full report of the image names and their corresponding FWHM and Aspect Ratio values by clicking on the Copy Report button. The resulting report will be placed on the Windows Clipboard, and can be pasted into a text document, spreadsheet, e-mail, etc. Here is an example of the report after being pasted into Microsoft Word:
File Path FWHM Aspect RatioC:\images\2005-08-24\VDB142_HA_20m.00000188.FIT N/A N/A%
C:\images\2005-08-24\VDB142_HA_20m.00000185.FIT 2.86 " 16%
C:\images\2005-08-24\VDB142_HA_20m.00000184.FIT 2.93 " 13%
C:\images\2005-08-24\VDB142_HA_20m.00000186.FIT 3.01 " 15%
C:\images\2005-08-24\VDB142_HA_20m.00000181.FIT 3.08 " 11%
C:\images\2005-08-24\VDB142_HA_20m.00000182.FIT 3.08 " 17%
C:\images\2005-08-24\VDB142_HA_20m.00000183.FIT 3.08 " 13%
C:\images\2005-08-24\VDB142_HA_20m.00000175.FIT 4.94 " 18%
C:\images\2005-08-24\VDB142_HA_20m.00000176.FIT 5.80 " 17%
11. As a shortcut, you can do most of the operations listed above by simply clicking the right mouse button on the image list:
Open will open all the selected images in Image Viewer
Remove will remove all the selected images from StarSieve list
Add More Images... will allow to select more images for
measurement
Move To Folder... will allow you to pick a folder to move
the selected images to
Copy To Folder... will allow you to pick a folder to move
the selected images to
Measure All will measure all the images in the list
Check All will select all items in the list
Uncheck All will unselect all items in the list
StarSieve derives the information about image scale from the image header. The software used to acquire the image needs to be set to record this information in the header, or it will not be available to StarSieve.
Here is how to set up CCDSoft to record the focal length information in the image header. Other software packages will do this differently.
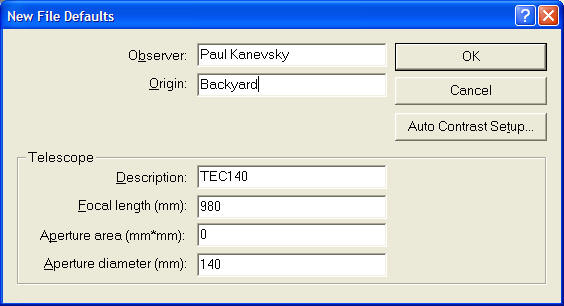
In order to display information in arcseconds, you will also need to ensure that CCDSoft knows the focal length of your imaging setup. For use with StarSieve, this should be expressed in units of mm. This can be entered in CCDSoft in the Camera Setup screen by pressing the File Defaults button:
Please make sure that the focal length is set in mm, and not inches, otherwise the arcseconds calculation will be incorrect.
Note: If you select display in Arcseconds, but the focal length or pixel size parameters are not available from the image, StarSieve will display measurements in pixels by default.
StarSieve employs a proprietary algorithm for star filtering and extraction. For each image, it will extract up to a few thousand stars from the entire image, ignoring hot pixels and other non-stellar structures. As part of the analysis, StarSieve will throw out stars that are bloomed or saturated, and any stars with too low a signal-to-noise ratio that will not yield an accurate measurement. It will then pick the median FWHM value, and the median Aspect Ratio value of all the stars remaining in the list. These will be the values displayed next to the image name.
By its nature, the FWHM and Aspect Ratio displayed represent an "average" value for the image. There will be some stars with higher and some with lower FWHM in the image. The same applies to aspect ratio value. The values chosen are meant to quantify the image for a meaningful comparison between similar images, such as multiple sub-frames of the same field of view.
For images that contain some field curvature at the edges, the resulting measurement will not be skewed by such curvature, as long as the majority of the stars are not on the periphery of the image.
A point source of light, such a star illuminates a number of pixels surrounding the center of the star. The center pixel is usually the brightest, with the intensity of the pixels falling off rather rapidly the further away one looks from the center pixel. The faster the light falls, the better the quality and sharpness of the star. The slower it falls, the more pixels the star occupies, the more bloated it is, and therefore less focused. To come up with a standardized way to measure star quality, independent of the brightness and magnitude of the star, the FWHM measure is used. FWHM stands for Full-Width at Half-Maximum and is simply the width (or the diameter) of the circle surrounding the star where the intensity has fallen off by 50% from the peak value (half-maximum).
Lower FWHM values are better -- means the star brightness falls off faster. There are many factors that limit just how low an FWHM value one can get. Some of these are:
1. Focus: telescope must be well focused to produced lowest possible FWHM.
2..Collimation: poor collimation will lead to more bloated stars with
higher FWHM
3. Seeing conditions: atmosphere is one of the major limiting factors even
for professional astronomers. On a good day, an average amateur with
excellent optics and collimation can hope for FWHM of 2"-2.5". On rare occasions
or at really great locations, the seeing can dip to as low as 1.6" but not much
below. More often than not, you're likely to see FWHM in the 3" to 4" range.
Anything much above 4" is usually a signal to go inside and watch some TV -- the
seeing is really poor.
4. Tracking and guiding: FWHM of a star in a long exposure can be much greater
than FWHM of the same star in a really short exposure. This happens because the
air masses keep moving causing seeing fluctuations during long exposures, and
guiders and mounts usually have small errors that add up over a long period to
smear the star a bit more.
Aspect Ratio: Aspect ratio represents how much out-of-round the star image is. It is the ratio of the longest axis to the shortest axis of the star profile, expressed in percent. A number below 20-30% represents a pretty round star. A number of 0% represents perfectly round star, but you will most likely not see this in real images due to noise and measurement uncertainty.
Operating systems currently supported are: Windows XP, Windows 2000. It should work with Windows 98, but has not been tested with it yet.
Other version of Windows may be compatible but have not been tested. If you test it on another operating system, please let me know what you find: e-mail me.
Newsflash 10/16/2005: StarSieve is no longer available for purchase. It will be replaced by a new product in the very near future. Existing StarSieve customers will continue to receive support, and will be offered an upgrade at a significant discount. Please, watch this space for further announcements.
To upgrade to version 1.0.6 from a previous installed version of StarSieve,
please download just the update file:
Click here to download just the update to StarSieve Version 1.0.6 (853 KB download)
| Release Date | Version Number |
Comments |
| 09/08/2005 | 1.0.6 | Added support for TIFF 8,16,24 ,and 32 bits
per color files, Grayscale or RGB. Great for DSLR users: TIFF files can now be measured, curvature mapped, and displayed and analyzed in Image Viewer. Added default image scale setting and dialog if scale is not available from image header Added Set Default Pixel Scale option to the StarSieve control menu Fixed a pedestal computation problem that resulted in negative-valued pixels for very dim FITS images Fixed a memory leak in the image viewer that could result in out-of-memory condition after viewing many images Slight changes to the automatic image range determination to better represent the full dynamic range of the image Title bar of the main window now displays the application version number Use of Apply To All button in image viewer range setting now sets the range for all future images viewed, until StarSieve is closed, or the setting is changed again by using Apply To All button. |
| 09/01/2005 | 1.0.5 | Added Field Curvature Maps Added Path column to image display Added Display Range control for images and maps Changed automatic zoom behavior of images when first displayed in Viewer Added Image copy to clipboard option from image viewer |
| 08/30/2005 | 1.0.4 | Fix for large FITS headers: too many items in the image header (as written by ACP) would cause a failure |
| 08/29/2005 | 1.0.3 | First Public Release |
| 08/26/2005 | 1.0.0 | Initial Beta Release for testing |
Please, e-mail me with any problems or anything that you find confusing or that can be improved.
Frequently Asked Question (FAQ):
1. Question: My non-US keyboard does not allow me to select multiple items in the StarSieve image list. What should I do?
Answer: This is a known issue with some international configurations of
Windows. To work around this, go to the StarSieve control menu (click on the
icon on the left side of the title bar).
Click the Use Checkboxes option near the bottom of the menu.
You should now see checkboxes appear next to all items in the image list. To select multiple images simply place a check mark next to each by clicking on the corresponding check box:
The rest of the StarSieve functionality will remain the same.
2. Question: Some of the images are reporting FWHM values that are too low, or
Aspect Ratio values that are too high. What's wrong?
Answer: Images with a lot of noise may fool the noise rejection filter in StarSieve and force it to measure some hot pixels as stars. To reduce the chance of this happening, measure images that have already been reduced with a d ark-frame subtraction, or let StarSieve subtract a dark frame as described in step 4 of the Using StarSieve section.
3. Question: I select "In Arcseconds" option, but the FWHM is still shown in pixels. What's wrong?
Answer: Images are normally saved with headers containing information about pixel size and focal length of the telescope. If the image you are measuring does not contain this information, StarSieve will be unable to determine the conversion factor from pixels to arcseconds, and will default to display in pixels. Check your image acquisition software to make sure that the focal length is properly specified for all new images.