The following tips are based on the PhotoShop version 6.0, but similar tools existed in version 5.0 and I believe are still there in version 7.0.
This technique has been discussed many times before, but I find it is still not that well known. There are a number of websites that present it in detail, but I've found there's a small twist that works best for me. So, I'll present it here again. Click here to see another treatment of this technique by Bert Katzung,
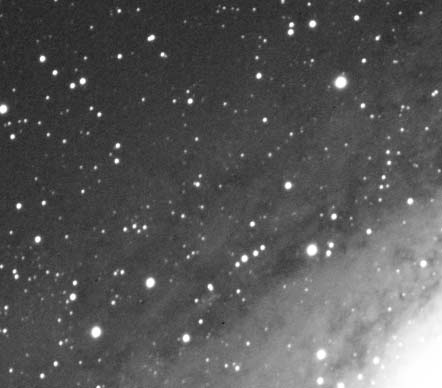
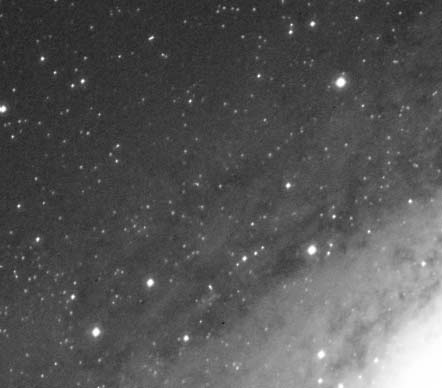
The Problem: Saturated or very bright stars appear bloated in long exposures. Also, poor seeing, inaccurate collimation, guiding errors, etc. can also result in fat stars. In some cases, very rich fields of stars can cover up and overpower a delicate nebula.
Yet another case is an RGB image acquired with an achromat that has blue channel bloating. The stars in the final image will appear to have blue halos because of the blue bloat. To reduce this effect, apply the following technique just to the blue channel.
The Solution: The technique of the Faded Minimum Filter works great in all of these cases. Use it only on 8-bit images.
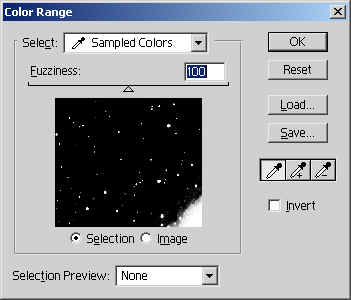
1. Use the Select/Color Range menu and select the middle of a bright,
saturated star. Adjust fuzziness so that most of the bright stars appear
selection preview:
2. Expand selection by 2 pixels using the Select/Modify/Expand menu.

3. Apply the Minimum filter by choosing the Filter/Other/Minimum menu. Choose 1 pixel radius for the filter:
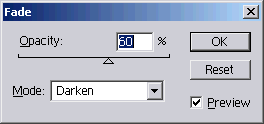
4. If the stars appear very small or not bright enough, apply the Fade/Darken filter. The Fade option is under the Edit Menu in PhotoShop 6.x and under the Filter menu in PS 5.x. Change the opacity to a smaller number to increase star brightness and size:
Here is the final result, next to the original image:
|
Faded Minimum Filter Image |
Original Image |
 |
|
Copyright © 2002 Paul Kanevsky