Because not all versions of Photoshop compute the Grayscale image the same way, here are the instructions that should work with versions of PhotoShop other than 6.0.
Pay particular attention to steps 2 and 3. They are critical to getting this method to work properly:
Step 1. Duplicate the original RGB image to a new document RGB copy
Step
2. Convert RGB copy image to grayscale
as follows:
2.1 From the Channels window, use the right arrow for additional menu commands and select Split Channels
2.2 Activate the R channel image produced in previous step
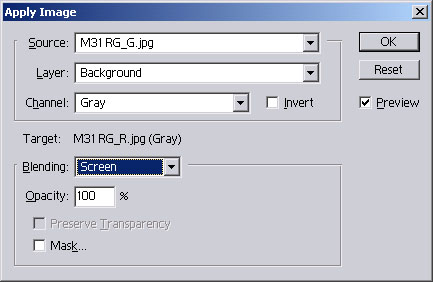
2.3 Select Image/Apply Image menu item
2.4 Change Source to point to the G channel image from step 2.1
2.5 Set Blending mode to Screen at 100%, and click OK
2.6 Select Image/Apply Image menu item
2.7 Change Source to point to the B channel image from step 2.1
2.8 Set Blending mode to Screen at 100%, and click OK
Step 3. Invert grayscale image in step 2.8 by selecting the Image/Adjust/Invert command
Step 4. Copy the grayscale image and paste it as a Layer 1 into the original RGB image
Step 5. Set the combine method for Layer 1 to Color Dodge:
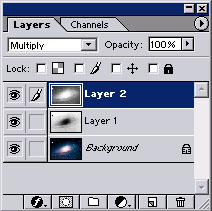
Step 6. Paste the new Luminance image as Layer 2 into the original RGB image
Step 7. Set the combine method for Layer 2 to Multiply:
Step 8. You are done! You should have three layers in your final image:
Layer 0 = Background is your original RGB image
Layer 1 = Grayscale, Inverted copy of your original RGB image
Layer 2 = Your Luminance frame taken, presumably with a clear filter
Copyright © 2001,02 Paul Kanevsky