Single (Defocused) Star Collimation Method
Defocused star collimation method is new in CCDInspector 2.1.0. The main
differences between the previously available collimation method in CCDInspector
and the Single Star Collimation (SSC) are:
- Only one, centered bright star is needed for SSC
- The star must be sufficiently out of focus, so as to fill out a circle of
at least 40-100 pixels radius
- The star must be positioned close to the image center
- The star must be be exposed well enough to get a good signal-to-noise
ratio
This method should look familiar to anyone who has done visual collimation
through an eyepiece. The main advantage of using CCDInspector is that unlike the
conventional methods, you can keep your camera attached to the telescope, your
hands and eyes next to the collimation screws and get a continuous and precise
numerical read-out of collimation error and direction.
Quick Start
The following describes all the steps necessary to start collimating. With
practice, this process can take as little as few minutes, even when the scope is
far out of collimation.
- Point your telescope at a bright star, well above the horizon. A magnitude
-2 or higher is recommended, but larger aperture telescopes may use dimmer
stars. A dim star can still be used, but may require a longer exposure.
- Start taking continuous images of the star using a focus routine of your
image acquisition software:
- Make sure the image acquisition software is properly selected in
Settings->Camera Control Software menu of CCDInspector
- you can bin the chip 2x2 or even 3x3. Binning increases S/N ratio, and
increases download/processing speed, so it's definitely recommended
- use automatic dark subtraction, if this option is available in the
acquisition software
- for bright enough stars, an exposure of one second can be plenty, especially
with a binned chip
- Start the collimation viewer from Real-Time->Collimation->Defocused
Star Collimation Viewer menu in CCDInspector
- Start the image viewer from Real-Time->Image
Viewer menu
- Position the image viewer window and the collimation viewer side-by-side,
so you can see both at the same time
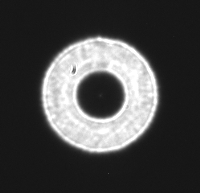
- Defocus the star so that it occupies about the size of the circle near the
center in the image viewer. Exact size is not very important, but it should be
greater than about 20 pixels radius, and not so defocused so as to become too
dim. CCDInspector can handle stars the size of about 90% of the whole chip,
and as small as 20 pixels radius. If the star is too dim, or too small,
CCDInspector will display a brief error message indicating the problem.
- Center the star as best as you can using your telescope's movement
controls. If it's not exactly at the center, no big deal. But, if it is really
far away, the error size and the direction will no longer be accurate.
- The circle at the center of the image viewer is positioned exactly in the
middle.
- The cross marks the center of the defocused star.
- Ideally, the cross should be positioned near the center of the circle (in
the image above, its away from the center, to the top right)
- Take a few images and watch the Collimation Viewer update. Each time the
window is updated, it will flash red for a few seconds, the number in the
center will change, and the direction arrow will be adjusted
- Your goal is to turn a collimation knob so that the image of the star
moves in the direction that the collimation arrow is pointing.
The star movement doesn't have to be exactly in this direction, but should be
close. You can determine which knob to turn by trial and error.
- After you turn the correct knob, you will see the image of the star shift
in the direction the arrow is pointing. In order to read the updated
collimation values, first, re-center the star using your telescope controls
- Wait a few seconds after making the adjustment for the telescope
vibrations to die down, and then watch the result shown in the Collimation
Viewer. The error number should decrease
- As the number gets smaller, the amount of knob adjustment needed also gets
smaller. With error value less than about 5, a very light touch to the knob in
the right direction is all that may be needed.
- Note: If the direction arrow keeps pointing in different directions all by
itself, your optics are already collimated to the best possible level under
the current seeing conditions: it's not advisable to proceed any further
- Repeat steps 8-14 until the value in the middle is as low as possible, and
while the direction arrow does not jump around to completely different
directions
- Under good seeing conditions, it should be possible to reduce the error to
near zero.
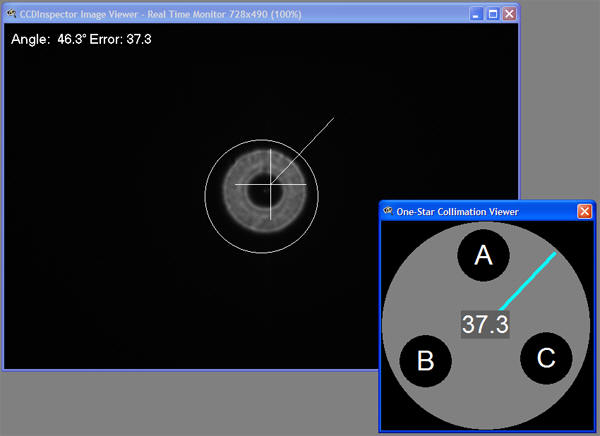
Collimation Viewer
The same Collimation Viewer that is used for the multi-star collimation
method in CCDInspector is also used for One Star Collimation method. The viewer
is a real-time display that provides an intuitive guide to the corrections
necessary to achieve perfect collimation. This tool uses innovative image
processing and image recognition algorithms,
and shows the result in a form suitable to real-time collimation:
Collimation Viewer can be started by clicking on the Real-Time->Collimation->Defocused
Star Collimation Viewer menu in CCDInspector.
Collimation viewer shows the three-screw, tip-tilt collimation arrangement
that is commonly used on SCT's, RC's, Newtonians, and other styles of
telescopes. This display is for mnemonic purposes, to help you keep track of
which knob does what.
Important: In order not to loosen the
secondary mirror completely, avoid repeatedly turning any one knob in the
counter-clock-wise direction. Turning a knob counter-clockwise is equivalent to
turning the other two knobs clock-wise.
The Viewer display shows:
-
The magnitude of the collimation error in the
center of the display. This number is unit-less, and doesn't change with image
scale or the amount the star is defocused
-
The direction of the collimation error is shown
by a line from the center of the viewer display. The line only shows the
direction of the error, not the error magnitude
Your goal is to get the error number as low as possible. On a night of good
seeing, this value can be lowered to nearly zero.
Note that the Collimation Viewer window can be sized to be better visible
from a distance: simply click and drag on the bottom-right corner of the window
to increase or decrease the display size.
Image Viewer
While the Collimation Viewer is displayed, the Image Viewer display will
overlay the image of the star with some additional graphics:
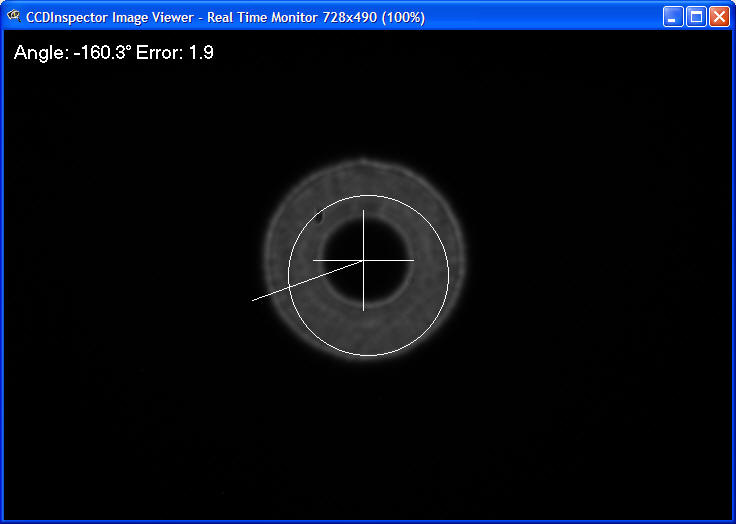
The Angle and Error display at the top show the collimation error
numerically: the error value is the same value as shown at the center of the
collimation viewer, while the angle is the angle in degrees of the error
direction (negative degrees indicate clock-wise direction, while positive
indicate counter-clock-wise).
The cross indicates the center of the star image, while the line circle
indicates the center of the CCD chip. As you make adjustments to collimation,
re-center the star by moving the cross closer to the center of the circle. The
extra line coming out from the center of the circle is the collimation direction
arrow. It points in the same direction as the arrow in the collimation viewer.
Helpful Hints
- Make sure to re-center the star if it moves more than about 20 pixels away
from the camera center. The accuracy of the measurement will be affected in
some optical designs (for example, SCT) if the star is far away from the
center
- You can use a sub-frame mode, but leave a background border of about 20-50
pixels all around the defocused star. Make sure that the subframe you use is
centered on the chip, otherwise the collimation accuracy will be affected
- A very bright star may require shorter exposure and/or no binning. If the
exposure is too long, there could be bright blooming and diffraction spikes
around the star that can affect accuracy. To see if this is the case, decrease
the display range of the image to make the star very bright on the display. If
you see solid rays emanating from the top and the bottom (sometimes left and
right) of the star, then the exposure is too long
- Don't make the exposure time too short, either. Less than 0.5 seconds is
not recommended, as that will often be affected by seeing changes in the
atmosphere. Best results will be achieved with an exposure from 0.5 to about 2
seconds.
- Pay particular attention to the collimation error direction arrow: if it
keeps jumping by more than 30-40 degrees between consecutive measurements,
then you have reached the limit of what can be done in the current seeing
conditions, regardless of the value of the actual error. Under good seeing
conditions, I have been able to lower the collimation error to less than 1.
Under poor seeing conditions, the error direction started getting jumpy at
around 5.